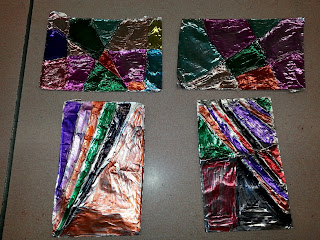
 This project has many possible alterations if you let your imagination run wild!
 What you need:
card stock, cereal box, some form of cardboard
unwanted yarn
scissors
aluminum foil
sharpie markers
tape (optional)
What you need to do:
Step 1: Cut a piece of cardboard to a size and shape that is smaller than the foil.
Step 2: Randomly cut small slits along the edges.
Step 3: Wrap the yarn around the cardboard in all directions. The more you wrap the smaller the individual areas will be to color.
Step 4: Secure the yarn with tape on the back if needed.
Step 5: Cover the front with a piece of foil that is slightly larger than the cardboard. Fold the edges around the cardboard and secure with tape if desired.
Step 6: Press down on foil to define the yarn under the foil
Step 7: Color the areas with Sharpie markers.
The students really enjoyed this project and we were able to compete it in a 45-60min time frame.
Many complements from the other teachers as well. As a possible alteration, you could change the shape of the cardboard as long as it still fits the foil. Another idea is to have the students write their names or create a picture with yarn and glue. That would take an extra class period but it would be neat to see what they would come up with! I might have them make another soon. Happy creating!


No comments:
Post a Comment