Thursday, November 14, 2013

How to make a roasted salsa.

Step 1: roast your tomatoes and peppers in the oven, broiler, or grill.
Step 2: remove the skins from the tomatoes and peppers
Step 3: cut up onion and cilantro
Step 4: Using a blender or food processor, add tomato, peppers, onion, cilantro, lemon juice, salt, pepper, oregano and garlic. Pulse until well chopped and blended.
 Step 5: Taste! You might need to add more peppers, or more tomatoes until you get the heat you like. You may also need to add more of the other ingredients too.

Once you have it tasting the way you like it, ENJOY! We make a lot at a time so we can ours and you can too.


The amount of the ingredients will vary based on your own personal tastes. The heat of your salsa will vary based on what peppers you use. If you like A LOT of heat, add some habaneros! But beware, you might need a box of Kleenex once your nose starts to run and your forehead starts to sweat. Hope you enjoy experimenting! Happy Creating!

Sunday, September 15, 2013

Christmas candy dishes

How cute are those candy dishes I posted earlier? Way cute! I've been busy making more! So here they are!
 
***UPDATE*** In case you haven't looked at earlier posts (the scarecrow candy dish) I will let you know how to make these here.
 
What you need:
terracotta pot and saucer(s) (I got mine on clearance at Menard's)
glass bowl (dollar tree has a few sizes to choose from)
knob for top (I used cedar moth balls from Menard's)
glue (E6000 or hot glue)
paint (acrylic for the pots and Enamels for the glass)
brushes, work space, water, embellishments
 
The total cost is around $2.50!
 
Step 1: Paint the pots, saucers and knobs anyway you like.
Step 2: Let them dry completely!! (Glue doesn't like to stick to damp paint)
Step 3: Paint the glass with enamels. (Bake in oven to set the paint-follow instructions on paint)
Step 4: Glue the glass bowl to the painted clay pot. Make sure they line up so the head is facing the front (Hot glue dries fast! E6000 is more forgiving.)
Step 5: Glue the knob to the saucer and place on the glass dish for a hat. It's best to not use the knob to lift the hat off the bowl in case your glue didn't adhere completely or you might break your candy dish.
 
You can create many different dishes for many different occasions! They are cute and don't take a lot of time to make. Embellish your candy dishes how ever you like. Make them your own!
Happy Creating! 
 

Wednesday, August 28, 2013

More candy dishes

Since so many have liked my scarecrow candy dish I figured I'd share with you images of other candy dishes I have made. Hope you enjoy! Happy creating.
 
 
I paint faces with enamel paints and bake the glass in the oven to make them more permanent.
I use acrylic paints on the clay pots and saucers.
Other materials used... twine (for straw), miniature clay saucers (mickey ears), yarn (Matthew's hair), bolts ... I used hot glue to fix everything together.
Make sure you clean the glass surface really well before painting faces or glue together.

Thursday, August 15, 2013

Scarecrow craft for Halloween

As I was driving home today an idea popped into my head. As soon as I got home I got to work. This is a super cute craft for fall or Halloween.

I'm sure you've seen similar items and it's the same concept just a different design painted on it. It's a scarecrow candy dish. When I was finished I showed a photo to my mom and she showed her man. He's not into candy so I told him to fill it with peanuts!


What you need:
  • clay flower pot and saucer
  • acrylic paint and brushes
  • glass bowl
  • wooden ball (I used cedar moth balls from the hardware store)
  • hot glue gun and glue
  • twine
  • scissors


What you do:
  • Paint the clay pot. I made mine look like it was in overalls and a plaid shirt.
  • Cut the twine into little pieces, about an inch long, and glue them to the neck line and above hands. It looks like straw popping through its clothes.
  • Paint the saucer and ball to be its hat. Once dry, glue the ball to the saucer.
  • Cut twine into slightly longer pieces and glue to the underside of the "hat" so it looks like hair coming out from under it.
  • Paint a face on the glass ball.
  • Glue the glass ball to the clay pot and place the saucer on top.
Another version I made was a witch. I painted the twine orange for her hair. I plan on filling the scarecrow with candy corn and the witch with something green... maybe those "orange slices" candy but the mint ones so they're green.


Monday, July 22, 2013

Want to paint on glass and make it look GOOD?

I started painting on glass in 2009 when I saw a painted glass at a store in my local mall. I saw the price they were selling them for and thought... that's too expensive for something so simple.

First you need to know a little about the paint. First I tried acrylics covered with a spray clear enamel. That worked on plastic if you hand washed them, but not on glass for everyday use. I went to my local craft store, NASCO, and looked to see what I could find. I found  pebeo vitrea 160, transparent paint for glass that you bake on in the oven and it makes it dishwasher safe. Problem with this paint is the limited color selection and it's TRANSPARENT! I didn't want a stained glass look. So I turned to the Internet. I know I should have just looked here first. I found Enamels for glass. I can buy them anywhere, online, at craft stores and even Wal-Mart. They are less than $3 for a 2oz bottle and they have so many colors, some even with glitter in.

Enamels are dishwasher safe, something you want for glasses that you plan on using. After they dry for an hour, place them in a cool oven, turn oven to 350 degrees, and bake for 30 minutes. I start my timer once the oven reaches 350 degrees it's about 45 minutes total in my oven. Then you let them cool in the oven. Wash and they are ready to use, or sell!

Now I told you I was going to teach you how to paint it and make it look GOOD. It's easy. Create a design on paper first, whether you draw your own or use clip art, that depends on your artistic talents. Make sure the size of the image will fit on the glass you want to paint on. I use Microsoft Word and Paint to create most of my images. I have big glasses (20 wine glasses) that I use and I know that I can't make the total image bigger than 4"x4" if I want it to look right on the glass. Once I have the font and image just right I print it out and cut it out. I just cut a square around the image so it fits better inside, yes inside the glass. Tape the image inside your glass so you can follow it when you paint.

Take your time and make sure everything is lined up and looks the way you want it to look. Remember the paint is going to be permanent and if you want to give them as gifts or sell them they need to look great! Before you bake the paint, you can still clean up some boo-boos but it can be tricky, especially if you don't want to start all over and wash the whole image off.

Get used to the brushed that you will be using. Have water, a rag and paper towels near by. I also have my x-acto knife and a orange wood stick near by. (An orange wood stick is a nail tool you can ask your manicurist for one next time you get your nails done.)

Once you have a clean glass and the supplies ready, you can start painting your glasses. If I want to make a set, I print out the image more than once and tape each of them into place, this helps me make sure they are all lined up in the same spot (again, little attention to details will pay off big).

Make sure you have enough paint on your brush or re-dip in the paint frequently to get a nice even coat. I've noticed that certain colors need more than one coat. The more you use your paints the more you will know about them. Think of the image taped inside the glass as a paint by number or a coloring book page. All you need to do is follow the lines to make sure the image turns out like the one you printed or drew.

Glasses curve so your image will do. If you have horizontal lines or really long words or phrases, they will tend to look like they are bending up on your glass. The easiest way to avoid this is to make sure they fit on the glasses without wrapping around too much. Another way to fix that is to curve the lettering on the paper slightly before you tape the image inside the glass. This will make your letters straighter on the glass. Another option is not to have things straight ... make it crooked on purpose but make sure it still looks good. Use your best judgment and artistic eye.

Using this method, you will have beautiful glasses in no time! Happy Creating!

Check out my Facebook page for hand painted glasses! A Glass of Art & More

Sunday, July 21, 2013

Camping: How to cut down on what you need to take.

CAMPING: DO YOU TAKE TOO MUCH STUFF FOR A DAY OR TWO TRIP???

We did all our cooking prep work at home. It really cut down on what we needed to bring camping.

BREAKFAST:
  • I made pancake mix in a zip lock and cut a whole off the corner when ready to cook.
  • Scrambled eggs with milk and salt and pepper in a zip lock
  • potatoes were washed and sliced in foil packets ready to go
  • bacon we cook on fire
  • use warm and serve sausage
  • Toast: butter the bread at home and stick 2 buttered sides together

LUNCH/DINNER:
  • sandwiches were pre-made except the mayo/mustard(which we have tons of packets of thanks to the fast food places or the pre-made subs from Wal-Mart)
  • hamburger patties seasoned and pre-shaped ready for cooking
  • pasta can be pre-cooked and you heat it in the sauce over the fire
  • Hot dogs and brats always ready to go
  • Individual servings of chips (I buy a variety pack)
  • potatoes washed and wrapped in foil for baking on the fire (I partially cook them in the microwave before we go.)
  • Grilled cheese: butter the bread at home and stick the butter sides together. Add cheese when cooking
DESSERT:
  • campfire cones instead of smores (waffle cones stuffed with marshmallows and chocolate chips wrapped in foil ready for the grill)
  • Bag of big marshmallows for toasting
How to keep it all cold?
  • We freeze our water bottles and/or juice bottles and use them as ice packs around the food. This cuts down on the bags of ice and melted water! We also don't pack any food items until just before we are going to leave on our trip.

Best way to limit what you take and/waste is to plan accordingly! Always have some cash with you and/or debit/credit card for emergencies.

Some helpful tips for your next trip! Hope you have fun!

Home Made Scratch Art Paper!

Make your own scratch art paper! It's fun, easy and cheaper than buying it. It's a great project for those kids that say "I'm done. What can I do now?"


What you need:
  • tag board or card stock
  • crayons
  • tempera/poster paint
  • liquid soap
  • toothpicks or other scratching tools
What to do:
  • Color the paper with crayons. You can use one color, multiple colors or even create an image. The paper must be completely covered in crayon. Any spots not covered will not scratch off. So use a thick heavy coat of crayon for best results.
  • Mix paint poster/tempera paint with a few drops of liquid soap.
  • Paint over the crayon. *Do not water down like some people tell you to or you will need a lot of coats just to cover the crayon.
  • Once dry use a toothpick to create an image.

Googly (AKA Woogly) Eyed Mosters

Want a fun creative art assignment that turns out awesome? Have the kids create monsters/aliens around googly/woogly eyes glued to a piece of paper!
What you need:
  • paper
  • googly/woogly eyes
  • glue
  • pencil
  • markers, crayons, colored pencils (any medium will work)
What you need to do:
  • Discuss some kid friendly movies like Monsters' University, Monsters' Inc., Monsters -VS- Aliens...
  • Tell the kids they will be creating their own monster or aliens
  • Instruct them to use 2-5 different size googly/woogly eyes and glue them on their paper before they begin drawing.
  • Have them create a monster/alien around the eyes (I found the kids were much more creative this way).
  • They must create a habitat for their monster/alien too. The whole paper should be colored when finished.
  • Color the monster/alien
  • Write a story to go with the monster on the back of the paper.

This is a unisex monster that needs no one to help it make more little monsters. The blue snot/slime has magical powers. The babies are one color until they reach adulthood. They grow to be 3 feet tall and 20 pounds. They are a gentle monster and love to socialize.

Sandpaper/Crayon Relief


What you need:
  • T-shirt, pillow case or other fabric
  • Crayons
  • Iron
  • Sandpaper (The finer the better but whatever is ok)
  • Imagination


Here's what you need to do:
 
Create a design and draw it on the sandpaper. *If you are going to make anything with words you need to do it backwards (mirror image).
 
Color the sandpaper with a thick/heavy layer of crayon.
 
Once the image is how you want it, get your t-shirt (any light color is fine) and a hot iron. (Set the iron on cotton.)
 
Place the sandpaper colored side on the shirt and cover with a paper towel.
 
Iron the towel covered sandpaper for about 30 seconds and the image will transfer to your shirt. It's that easy!
 
Heat set the t-shirt in a hot dryer for about 30 minutes and wash in cold water (by itself) for the first couple of washes. You might also want to try to set the colors by soaking the fabric in vinegar and cold water before washing it.
 
Happy Creating!
 

Sharpie Tie-Dye T-Shirt

Kids have fun making these shirts!! You could use this process on towels, pillow cases... anything really.
 
What you need: 
  • a light colored shirt
  • sharpie markers
  • plastic cup
  • rubber band
  • rubbing alcohol
  • hair dyer (optional) 
 
Place the cup between the shirt and use the rubber band to secure the shirt to the cup. (ah-ha moment... I bet cookie cutters would work cool too if you wanted shapes other than circles!)
 
Color the area with markers (any design you want, random or images) and pour some rubbing alcohol on the area. Watch as the colors bleed together creating a tie-dye effect. Lighter colors bleed better than darker colors. You can use a few drops or a lot depending on the look you want.
 
Using the hair dryer, dry the rubbing alcohol before moving your cup to another spot to avoid bleeding through the back side. Move your cup to another spot on your shirt and repeat the process.
 
You're done whenever you want to be done. We made ours in the shape of an "L" and then added "ina" for LINA.
 
Toss in the dryer for 30 min on high to help set the colors. Also you can try soaking in vinegar and cold water to set colors before washing. Wash in cold water by itself for the first wash. Colors may still fade some. 

 
Happy Creating!

***Update***
These are fun shirts to make but the colors fade fast in the wash. I tried to soak the shirts in vinegar to set the colors and I even tried to set the colors by putting them in the drier on HIGH heat for about an hour, but they still fade. Good news is that you can use the same shirt to do the project again and again! Remember to also wash with like colors... we don't want pink socks that were supposed to be white. ;)

No Sew Art Apron

I originally found this project on Pinterest while searching for cute projects for my summer art program. bystephanielynn.com has a great tutorial on how to make this super easy, super fun apron for kids. Here is the link to her page: http://www.bystephanielynn.com/2012/12/how-to-make-a-no-sew-kitchen-towel-apron-a-simple-baking-crafting-apron-for-kids.html

I decided this apron would be awesome for the kiddos in my summer art program for when we do those messy projects.

Here is what you need:
  • Stitch Witchery
  • scissors
  • kitchen towel (15"x25" is what I used)
  • clothesline cord
  • steam iron
  • damp cloth
  • measuring tool
  • fabric paint or markers (optional)


Here's what to do:

Step 1: Cut about 90" of clothesline cord. This is enough to wrap around the child and tie in front. I also taped the ends of the cord so it doesn't fray and it's easier to thread threw the hole incase it comes out.

Step 2
Step 2: Fold the top two corners to create the neckline. I eyeballed it but it measures 5" from
the top and side. I then ironed it to create a crease.


Step 3: Place the cord before you use the Stitch Witchery so you don't have to thread it in place after. Just saves time and hassle. Cut an eight inch piece of stitch witchery for each side (or 2 - 4" pieces).
Place the Stitch Witchery about an inch from the side and top leaving the space for the cord without any Stitch Witchery.


Step 4:  Follow the package instructions and iron neckline. You will need a damp cloth and your steam iron set to Wool if you're using Stitch Witchery.

Step 5: Create the pocket(s). I placed the apron on my daughter to see how long it was and then folded the bottom half up to create the pockets on her apron. (Anywhere from 5" - 8" for the pocket will leave the apron a good length for your little helper.) All you have to do is put some more Stitch Witchery along the sides, and more in the middle if you want more then one big pocket, fold and iron just like with the neckline.


Step 6 optional: Decorate with fabric paint or markers. I'm going to be making more of these and using the sharpie marker and rubbing alcohol to create a tie-dye effect. Or maybe the sandpaper and crayon resist method. So many options!
 
I took those pictures before the fabric paint was dry but there is plenty of cord to wrap around and tie in the front. The neckline is adjustable so it can be pulled up more to cover more of your child. Just pull on the cords. Happy creating!
 
 
***UPDATE***
I suggest hand stitching where the tape is. The tape won't hold up in numerous washes. I'm also experimenting with the liquid stitch to see if it holds better. :)
 
Happy Creating!!

Monday, July 8, 2013

Black Glue Abstract Art!

Super fun for the kids and super cool outcome!

What you need:
  • used school glue like Elmer's (You don't need a full bottle.)
  • black tempra/poster paint (Why? Because it's washable!)
  • stir stick to reach the bottom of the glue bottle
  • heavy paper like a watercolor paper
  • markers, crayons, oil pastels, water colors, or any other medium you like (we used markers)

What to do:
  • Add black paint to the glue bottle no need to measure just add enough to color it black.
  • Stir the glue with your stick (craft sticks work well, I also shook the bottles to mix).
  • Take your paper and glue outside (no need to clean up or use newspapers).
  • Squirt the glue onto the paper in any pattern desired (we made them abstract).
  • Let the kiddos play outside for a while
  • Take the papers and glue back inside and let dry over night.
  • Once dry, color with the medium of your choice.


I personally liked the ones that the kids left some white paper showing. Some students chose to color patterns and designs while others just used solid colors. It's a project I'll use over again and I might even tweak it to make it more advanced for the older students. Happy creating!

Wednesday, July 3, 2013

Edible Mosaics

You'll want to do this project early in the day so the kids have a lot of time to run off the sugar!

What you will need:
an edible base: sugar cookies or gram crackers
frosting
colored candies like M&Ms or skittles
plates
knives
eager kids with a great imagination
photo examples if desired


What you do:
  • Discuss what a mosaic is, where you have seen them and possible images they can create.
  • Have everyone wash their hands!!
  • Pass out paper plates and edible base (we used gram crackers)
  • Spread a thick coat of frosting on the base
  • Create patterns or images with the candies
  • Take pictures of the process
  • Eat and enjoy!


What a fun project this was. The kids learned more about mosaics and being more creative with their food. This project could easily be made with fruit and cream cheese to cut down on the sugar intake. Another possibility is getting creative with veggies and dip! Happy creating.


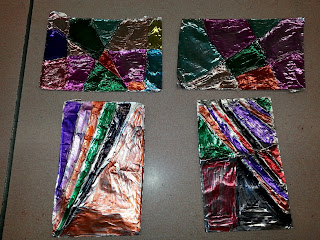
Modern Tin Foil Art

This project has many possible alterations if you let your imagination run wild!


What you need:
card stock, cereal box, some form of cardboard
unwanted yarn
scissors
aluminum foil
sharpie markers
tape (optional)


What you need to do:
Step 1: Cut a piece of cardboard to a size and shape that is smaller than the foil.
Step 2: Randomly cut small slits along the edges.
Step 3: Wrap the yarn around the cardboard in all directions. The more you wrap the smaller the individual areas will be to color.
Step 4: Secure the yarn with tape on the back if needed.
Step 5: Cover the front with a piece of foil that is slightly larger than the cardboard. Fold the edges around the cardboard and secure with tape if desired.
Step 6: Press down on foil to define the yarn under the foil
Step 7: Color the areas with Sharpie markers.
 
The students really enjoyed this project and we were able to compete it in a 45-60min time frame.
Many complements from the other teachers as well. As a possible alteration, you could change the shape of the cardboard as long as it still fits the foil. Another idea is to have the students write their names or create a picture with yarn and glue. That would take an extra class period but it would be neat to see what they would come up with! I might have them make another soon. Happy creating!